Thought you might enjoy a little sneak of the KIT for May (on sale tomorrow) Thanks again to Heather our Featured Embellie designer for May!
Friday, April 30, 2010
Sneak of May Embellishment kit
Monday, April 26, 2010
Saturday, April 24, 2010
You could WIN
Check out the current GAME on "Who WANTS IT" You could win a partial Embellishment kit for MAY. Join in now!
Tuesday, April 20, 2010
Congratulations Heather (scrappin_in_AK)
Heather will be our first Featured Designer and will reveal ( May 1st )her creations with the May Embellishment kit!
Here is a bit about Heather!
"I've been fortunate to live in two amazingly beautiful places - originally from Northern Ireland but now live in Alaska. Dh Dan and I have a very photogenic daughter Lauren (age 9) and a very photo phobic son Nathan (age 11). We share our home with 2 dogs and 3 cats and we love to travel, to hike and fish (well - I like to read, they like to fish- LOL!).
Of course, I love to scrapbook and have been scrapping for about 6 years. I dabble a little in digi and also love to make cards. Primarily I prefer to scrap in a bold graphical style but I can try my hand at most things. My fav teqniues are sewing and photo editing."
All applications for the May position are still good for the June Featured Designer-Watch your email for your chance to be featured!
Congrats again Heather!
Wednesday, April 14, 2010
Challenge from Darlene
One of our wonderful members has challenged us!! Her challenge is to alter a piece of wood. She has made this beautiful piece of altered art to give to her husband's grandmother (who I know will be thrilled to receive it!!)..JPG)
You'll find this challenge on the MB by clicking here. She is also going to give away a RAK to one lucky person. Be sure to get a photo of your altered piece of wood in the gallery by May 1st!
Thursday, April 8, 2010
Desgin Team Pick of the Day! Jean!

Wednesday, April 7, 2010
My April kit creations
The April "A Little Birdie Told Me" kit is up for sale ladies!! This kit was so much fun to work with! I loved the pastel colors with the black! Get yours while you can! Here are the layouts that I created with it. Enjoy!!
Such a Ham
Priceless Moments
Dressed In Style
Adoration
Friday, April 2, 2010
Thursday, April 1, 2010
POTD 4/01/10 Scrappin in AK!!!

Wednesday, March 31, 2010
Today's Pick of the day
I absolutely adore these little bunnies that Colleen made to hold some candy for her family. Check them out in the M2R gallery!
Thursday, March 25, 2010
Ribbon Organizing Tip!
There is NO other scrapbook supply that I collect more than FABULOUS ribbon!!! Yards and Yards of FABULOUS ribbons!!!!
This often poses a problem though for a lot of people.....Especially a STORAGE problem! I know we all have our own ways of storing ribbon but I just wanted to share what "I" do and organize MY ribbons!!!!
I use book rings!!! You can find them in varying sizes and colors and I organize mine by color. All of my pink ribbons on one ring all of my blue on another and so on and so forth then I have some peg board that I keep all of my supplies on and I hang them off of a long pronged hook OR you can get and old paper towel holder and clip your book rings to that! Or something ive done in the past was to put them on a wooden dowel hung up in my scrap space.
Here is a photo of my example:
Wednesday, March 24, 2010
A springy HB card for ya!
I still have a few scraps of my March kit so I thought I would make a card from them. Love the colors of the papers from the kit and they pair up with kraft cardstock perfectly! I cut out 1 big square from kraft cardstock, 4 squares from the green pattern paper, a scalloped circle from the red Jenni Bowlin paper, and some smaller circles from various cardstocks and then stamped Happy Birthday on the smallest circle. I liked how it looked but wanted to add a little pizazz by adding some ribbon and the butterfly. If you haven't tried a springy card, now's the time. Be sure to post it to the gallery so we can see it!!
Friday, March 19, 2010
Embellishment Kits, coming in MAY
Beginning May the 1st M2R will be offering Embellishment kits. Each kit will focus around a theme of that month and will include at least one CHARM....a real charm! Each kit will be free shipping and will arrive to you via USPS. Watch for the M2R May Charming Embellishment kit sneaks. (I just can't keep a secret long)
Thursday, March 18, 2010

Wednesday, March 17, 2010
Seeing green today!
I have to brag on a couple of our ladies who have filled the gallery with some gorgeous green layouts. Jean and Heather have been chosen today as Pick of the Day because of these gorgeous green layouts! So in honor of St. Patrick's Day, here they are!
Heather's layout
Jean's layout
Please join me in giving these ladies some love!
Tuesday, March 16, 2010
Design Team Pick of the Day

Isn't this LO Beautiful? I love the flowers! The tutorial for these flowers is below! They are easy, fun and adorable!! Thanks Colleen!
Monday, March 15, 2010
Handmade Flowers
Thanks so much to COLLEEN for the inspiration to try these!!!!!!
Supplies:
Satin fabric (or any lining type fabric)
Scissors
3 sizes of circles (make cardboard patterns or use a die and die cut machine)
pins
heat gun
buttons, brads (things for centers)
Fold fabric several times and pin pattern on top-Cut out stack of circles.
Stack several of each size (at least three of each)
Use a button or brad to attach all in the center.
Use the heat gun to slowly heat and curl the fabric-I used a poker tool to keep the flower from blowing away.
Thursday, March 11, 2010

Wednesday, March 10, 2010
March's challenges!
Don't forget about our March challenges ladies!! We have some fun layouts to get your scrapping mojo going!
Holly's monochromatic challenge
Char's texture challenge
Aimee's shape challenge
Courtney's green monochromatic challenge
.jpg)
Thursday, March 4, 2010
Design Team Pick Of The Day!!!

Wednesday, March 3, 2010
March kit layouts
I really enjoyed playing with the papers that came in the March "Time for Brunch" kit. Such a wonderful mix of paper lines! Here are the layouts that I created with it!


Monday, March 1, 2010
March 1st is here
We at M2R have so many fun things come out every 1st day of the month-I just love the 1st!
You can participate in challenges or check out the DT March Reveals or simply just grab the fabulous March Kit from the store!  No matter what you choose, you will enjoy the 1st of the month as much as I do!
Have a charming week,
Holly
P.S. Watch for the newest Charm requirements to be posted soon!
Friday, February 26, 2010
May Monthly Designer Call
The Next DT call will be for one Designer to use the NEW Embellishment kit (Beginning May 1st) Each month will feature a new designer using the M2R Charming Embellishment Kit!
Moments to Remember is currently seeking 1 featured designer for the month of May.
Focus on Embellishments-Show us what you can do!
Submission requirements:
* You will need to submit 2 layouts.
* All submission are to be sent to moments2r@yahoo.com
* The deadline for submission is April 1st.
* Designer will be announced by April 15th, 2010.
* You will receive the May kit and REVEAL on May 1st., 2010
Designers should use the M2R DT blinkie and promote M2R where ever and when
ever possible! We want each Designer to be proud to be a M2R Designer.
Designer Requirements:
The Designer will be required to complete: At least 2 layouts Using the M2R Charming Kit.
Participation on our Message Boards, Crops and in our galleries is a Requirement.
This includes posting on the boards, leaving comments in the gallery, posting challenges/questions, and encouraging others!
Please note that this is not a contest, so we are not necessarily looking
for the BEST projects. Rather, we are looking for the best designers who fit into our friendly and encouraging community and are interested in helping us
GROW and add new members to the site!
This call is currently open to US designers ONLY.
Thanks,
M2R Administrator
Thursday, February 25, 2010

My Wednesday project
.....which is a little late. So sorry!!
I just adore my son's teacher so I wanted to make her something to let her know how much she is appreciated. So I made her this cute little sticky memo pad which has a strip of magnet on the back so she can hang it up. 
I started with a 6 1/2" x 4 1/2" piece of yellow cardstock and layered it with the BG pattern paper that measures 6 1/4" x 4 1/4". Then I just decorated it as I wanted, added a stack of sticky memo pads to the front and a strip of magnet on the back. This is perfect for anyone and it was so easy to make!!
Have a wonderful day!!
Aimee
Tuesday, February 23, 2010

Friday, February 19, 2010
CLEAR FUN!
How many of you have several transparencies and are not sure when or where to use them……Here is a fun way to use up that stash and create a fun and interesting Layout design too!
Cut a portion of the transparency out and line it up along your layout lines or design. Adhere and enjoy!
In my example, the wings and heart are from a transparency!
Tuesday, February 16, 2010

Friday, February 12, 2010
Hurry-Time is running out!

Moments to Remember invites you to “Show us the Love” contest.
Entries will be accepted January 13th thru February 13, 2010.
Create one layout with the following requirements:
Theme-LOVE
At least 1 heart.
At least 2 word title.
At least 3 patterned papers.
1 entry per person Please.
Register on the website and in the gallery to upload your entry into the “Love” Contest Folder.
The design team and staff will be voting on their favorite and the winner will be announced on February 14, 2010.
The winner will receive a Maya Road Calendar Kit. Over $43.00 value.
A M2R virtual charm and recognition on the forum and Blog.
All participants will receive a virtual charm for their forum bracelet.
http://moments-2-remember.com
Wednesday, February 10, 2010
Happy Hump Day!!
Hi ladies!! How's your Wednesday going? I hear a lot of you are still snowed in and still getting more snow. I'm guessing that most of you are saying, "UGH!!!" But keep a positive outlook, you get to stay home and SCRAP!! What can be more fun than that?!?!?
Today I am going to show you an adorable snowman paper piecing. This is a simple, quick, and fun way to add some pizazz to your layouts! Great for those snowy day layouts!! Click here to get the pattern. Have fun with these adorable little guys and be sure to post them in gallery!! If you like the pattern papers I've used, be sure to check out the M2R shop to get these papers!! Here is my snowman and his snowwife!!!
Have a wonderful Wednesday!!!
Aimee
Tuesday, February 9, 2010
Pick of the Day !

This wonderful LO is the "Pick of the Day" ! Congrats Cheryl !!!
Have a great day! Char
Saturday, February 6, 2010
Want to take a challenge?

So sorry this is late-Lost my internet due to weather....but better late than never!
Thought it might be fun this week to issue you a scrappy challenge! Create a 12 x 12 layout using a tinted photo (any tint color you want-no regular color or black and white photos) Also show me some cutwork...I wanna see you do some fussy cutting on that page! Once you complete the challenge-upload to the M2R gallery-the link is in the right side bar!
Thanks, in advance, for playing along!
Thursday, February 4, 2010
User Gallery POTD 2/4/10
i just love this amazing photo and how it is the main focus!!! By Alteredchix10
Tuesday, February 2, 2010

Friday, January 29, 2010
Scrap Embellishment Tutorial
(thanks to my friend SARES for the inspiration to try this technique)
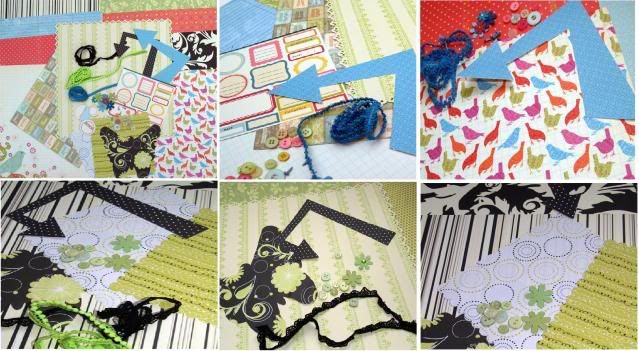
Gather your supplies, scraps, adhesive, punch and a base cardstock piece (I use 8 1⁄2 x 11)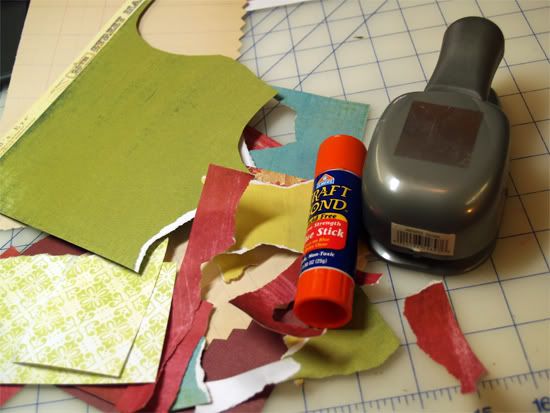
Glue the pieces together onto the cardstock to form a collage of scraps.
Cover as much of the cardstock as you think you will need!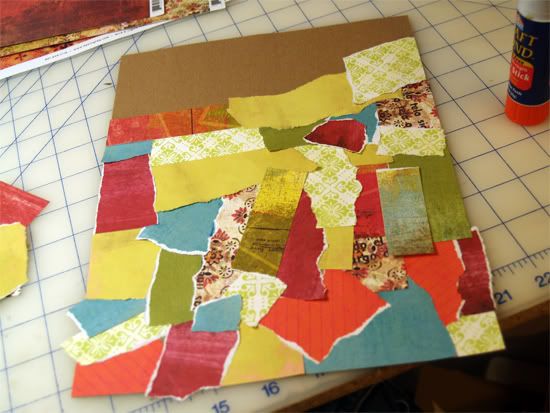
Use your punch to punch out shapes that show several scraps in an appealing way.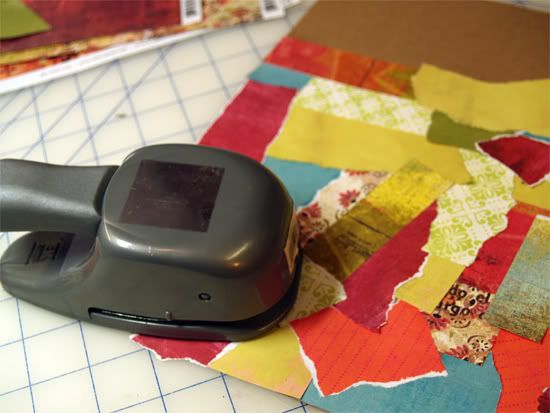
These little embellishments are fun to arrange and rearrange due to their varied colors!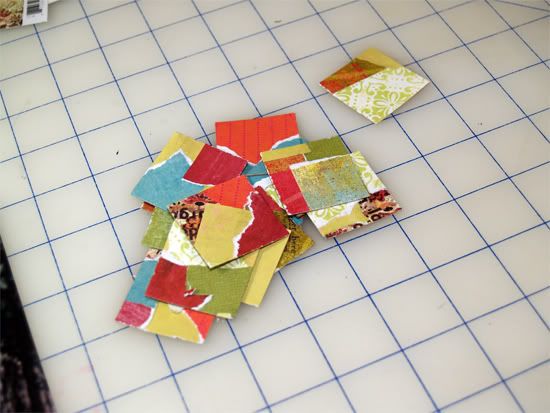
Place punched pieces onto your layout and enjoy!
Have a charming weekend!
Holly
Thursday, January 28, 2010
Raised Watermark Tutorial
Here I will show you a super easy and popular technique used everyday in the scrap world. Today we will be learning how to leave a raised watermark impression. First gather the following supplies, you will need, a heat gun, some embossing or pigment ink any kind of ink that dries slowly can be used here, embossing powder in clear, any stamp, some paper, and some ink that is darker than the paper you’ve chosen.
 First grab your stamp and coat it generously with the embossing ink, you can do this by pressing the stamp onto the pad of ink or by picking up the ink pad and pressing it down onto the stamp.
 When you feel you have coated the stamp with enough ink hover your stamp above your paper to get it into position then press down firmly. Remove the stamp and wash with soap and water or wipe off with a baby wipe.
Next unscrew the cap from you embossing powder and pour over stamped image. You want to be fairly quick with this step to prevent drying out the ink
Turn on your heat gun and let it warm up a few seconds then point toward your image. If you are using a light or thin piece of paper sometimes its better to apply the heat from behind the paper to reduce the chance of burning your paper and leaving unsightly marks.
Your image is correctly embossed when it turns shiny and has a smooth texture
Now that your image is embossed take out your ink that is darker than your paper. Here you can apply the ink directly to the image. A great tip is to use an application tool, I personally prefer to use makeup sponges to save money and time. Saturate your applicator.
Rub onto image. In the end you have a fabulous image that adds depth and personality to any project!
Subscribe to:
Posts (Atom)