
TERRIFIC TUESDAY CHALLENGES 10/9/2007
Cover Me Challenge*: Create a layout using this week's album cover, let it to inspire you with design, layout, color, title, etc.
LINK: http://moments-2-remember.com/messageboard/viewtopic.php?t=273
Hybrid Challenge*: Create layouts using a digital element.
LINK: http://moments-2-remember.com/messageboard/viewtopic.php?t=258
Unsual Embellishment*: Create a layout using 1 unusual embellsihment having to do with fall.
LINK: http://moments-2-remember.com/messageboard/viewtopic.php?t=271
Card Challenge #2: Create a card using: a charm, stitching (real or faux) and ribbon.
LINK: http://moments-2-remember.com/messageboard/viewtopic.php?t=275
*Denotes charm earning challenges.
Wednesday, October 10, 2007
Terrific Tuesday Challenges 10/9/2007
Terrific Tuesday Challenges 10/2/2007
TERRIFIC TUESDAY CHALLENGES: 10/2/2007
Get Ready for Xmas Challenge: Create a Christmas card
LINK: http://prelude.websitewelcome.com/~moments/messageboard/viewtopic.php?t=184&sid=2da59cdf07b41084a136734f6eaa219f
Fall Line Up Challenge*: Create a layout using the title of a REALITY TV show as the title of your LO! The show can from any where in the world, so do a little research and you will find TONS of titles are out there!
LINK: http://prelude.websitewelcome.com/~moments/messageboard/viewtopic.php?t=190&sid=2da59cdf07b41084a136734f6eaa219f
ABC Embellishment Challenge*: Create a layout using diecuts, eyelets, and flowers (D,E,F).
LINK: http://prelude.websitewelcome.com/~moments/messageboard/viewtopic.php?t=161&sid=2da59cdf07b41084a136734f6eaa219f
Number Challenge*: Create a layout focused on your birthday....you may use the month (number ) or the Day(Number). You will use this number to determine how many different patterned papers you will use!
LINK: http://prelude.websitewelcome.com/~moments/messageboard/viewtopic.php?t=182&sid=2da59cdf07b41084a136734f6eaa219f
*Denotes Charm earning Challenges.
Terrific Tuesday Challenges 9/25 2007
TERRIFIC TUESDAY CHALLENGES 9/25/2007
Cover Me Challenge*: Create a layout using this week's album cover, let it to inspire you with design, layout, color, title, etc.
LINK: http://prelude.websitewelcome.com/~moments/messageboard/viewtopic.php?t=105&sid=2da59cdf07b41084a136734f6eaa219f
Hybrid Challenge*: Create layouts using both traditional scrapping with a little digi flair!!
LINK: http://prelude.websitewelcome.com/~moments/messageboard/viewtopic.php?t=80&sid=2da59cdf07b41084a136734f6eaa219f
Unsual Embellishment*: Create a layout using an unusual items for your LO that you can journal on top of.
LINK: http://prelude.websitewelcome.com/~moments/messageboard/viewtopic.php?t=89&sid=2da59cdf07b41084a136734f6eaa219f
Mirror Mirror Challenge: Create a layout using a layout that you did in the past that you really loved! Pay close attention to the design and how you laid out the photos, title, and different elements on the page because this week your challenge is to copy the DESIGN.
LINK: http://prelude.websitewelcome.com/~moments/messageboard/viewtopic.php?t=108&sid=2da59cdf07b41084a136734f6eaa219f
*Denotes charm earning challenges.
Tuesday, October 9, 2007
PAPER BAG ALBUM
Project by Sarah Edens:
(you may have to copy and paste the images in another window)
SUPPLIES:
-Paper lunch Bags (any size)
-adhesive
-paper trimmer
-stylus
-hole punch
-bone folder (or some other way to crease)
PAPER BAG ALBUM
Step 1: Fold and crease bags both directions at the base flap. This iswhere each page of the album is going to fold/turn. You can do as manyas you like. I did 4 bags, which means this album will be 6 pages, andfront/back cover.
http://i71.photobucket.com/albums/i143/beware0fcurves/PBA2.jpg
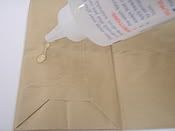
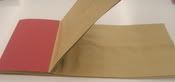
Step 2: Adhere the base flap down to the bag.
http://i71.photobucket.com/albums/i143/beware0fcurves/PBA4.jpg
Step 3: Glue bags together at the base flap.
http://i71.photobucket.com/albums/i143/beware0fcurves/PBA3.jpg
Completed:
http://i71.photobucket.com/albums/i143/beware0fcurves/PBA5.jpg
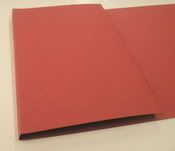
Adding the cover:
Cut paper to size of base flaps:
http://i71.photobucket.com/albums/i143/beware0fcurves/PBA6.jpg
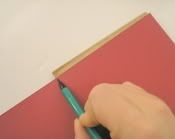
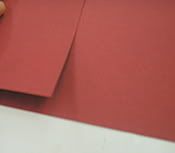
Mark where your first score line should be.
http://i71.photobucket.com/albums/i143/beware0fcurves/PBA7.jpg
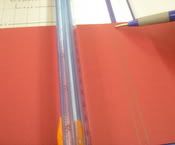
There should be two score lines for the edge. Use a stylus and yourpaper trimmer to score the paper.
http://i71.photobucket.com/albums/i143/beware0fcurves/PBA8.jpg
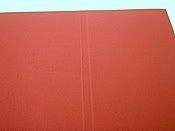
You should have two clean score lines for easy folding.
http://i71.photobucket.com/albums/i143/beware0fcurves/PBA9.jpg
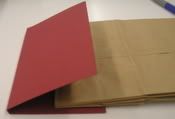
Fold the lines, so that you can mark where your next cut will be.
http://i71.photobucket.com/albums/i143/beware0fcurves/PBA10.jpg
http://i71.photobucket.com/albums/i143/beware0fcurves/PBA11.jpg
Cut to fit.
http://i71.photobucket.com/albums/i143/beware0fcurves/PBA12.jpg
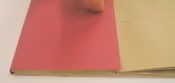
Glue down.
http://i71.photobucket.com/albums/i143/beware0fcurves/PBA13.jpg
Binding is complete, now you can decorate!http://i71.photobucket.com/albums/i143/beware0fcurves/PBA14.jpg
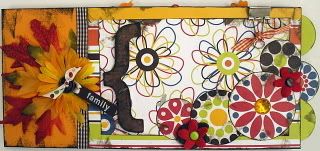
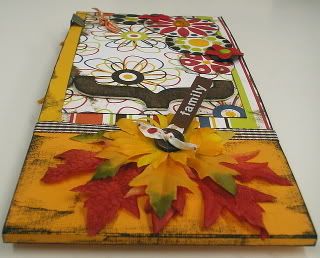
EXAMPLE:
http://i71.photobucket.com/albums/i143/beware0fcurves/FallBookCover1.jpg
http://i71.photobucket.com/albums/i143/beware0fcurves/FallBookCover2.jpg
AWESOME EXAMPLES and project!! THANK YOU SARAH!!!
Subscribe to:
Posts (Atom)
